
You may use this tutorial for personal use only. Please do not distribute in groups, post on a website or send via
email without permission by me. This tutorial is copyrighted by me. Please do not share.
Debi Jarrell
To do this lesson, you need Paint Shop Pro - any version, although this is done in version 8.
You can get it here. You also need a graphic, not a tube, that is at no more than 400 px long on the longest side.
Open your image, duplicate it, and close the original. Resize the picture until it is 400 on the longest side.
Step 1. Add borders
2 pixels with black
1 pixels with white
2 pixels with black
Step 2.Select all
Step 3. selection>modify>Contract 5 pixels
Step 4.Effects>3D effects> cutout using the following settings:

(2,2,62, 10 black. Repeat using -2,-2, 62,10 black.)
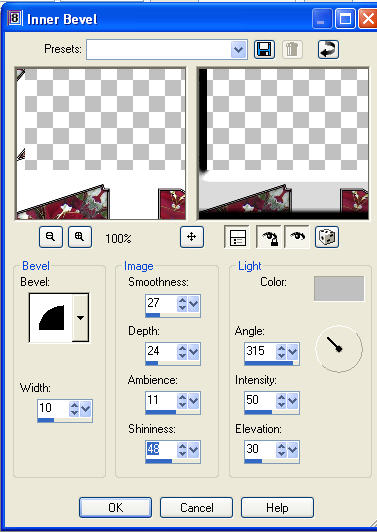
Step 5. Click on bottom layer, Invert, effects>3 D effects> inner bevel using the following settings:

Deselect
Step 6.Add borders 50 white. Select with magic wand
Step 7.Effects>reflection effects>Kaleidoscope

Step 8. effects>3d effects> inner bevel using these settings:
Step 9. effects>texture effects>fur

Step 10. effects>3d effects>inner bevel using the same settings as #8
Deselect
Step 11. Add text. I used the following settings with the color #CCC99C

Step 12. Convert to raster.
Step 13. Use the same bevel effects as in #8
Step 14. Add new raster layer. Add your watermark, merge merge all.
I hope that you enjoyed this tutorial. If you have any questions you can email me here.
Copyright © 2008 Debi Jarrell
All Rights Reserved